
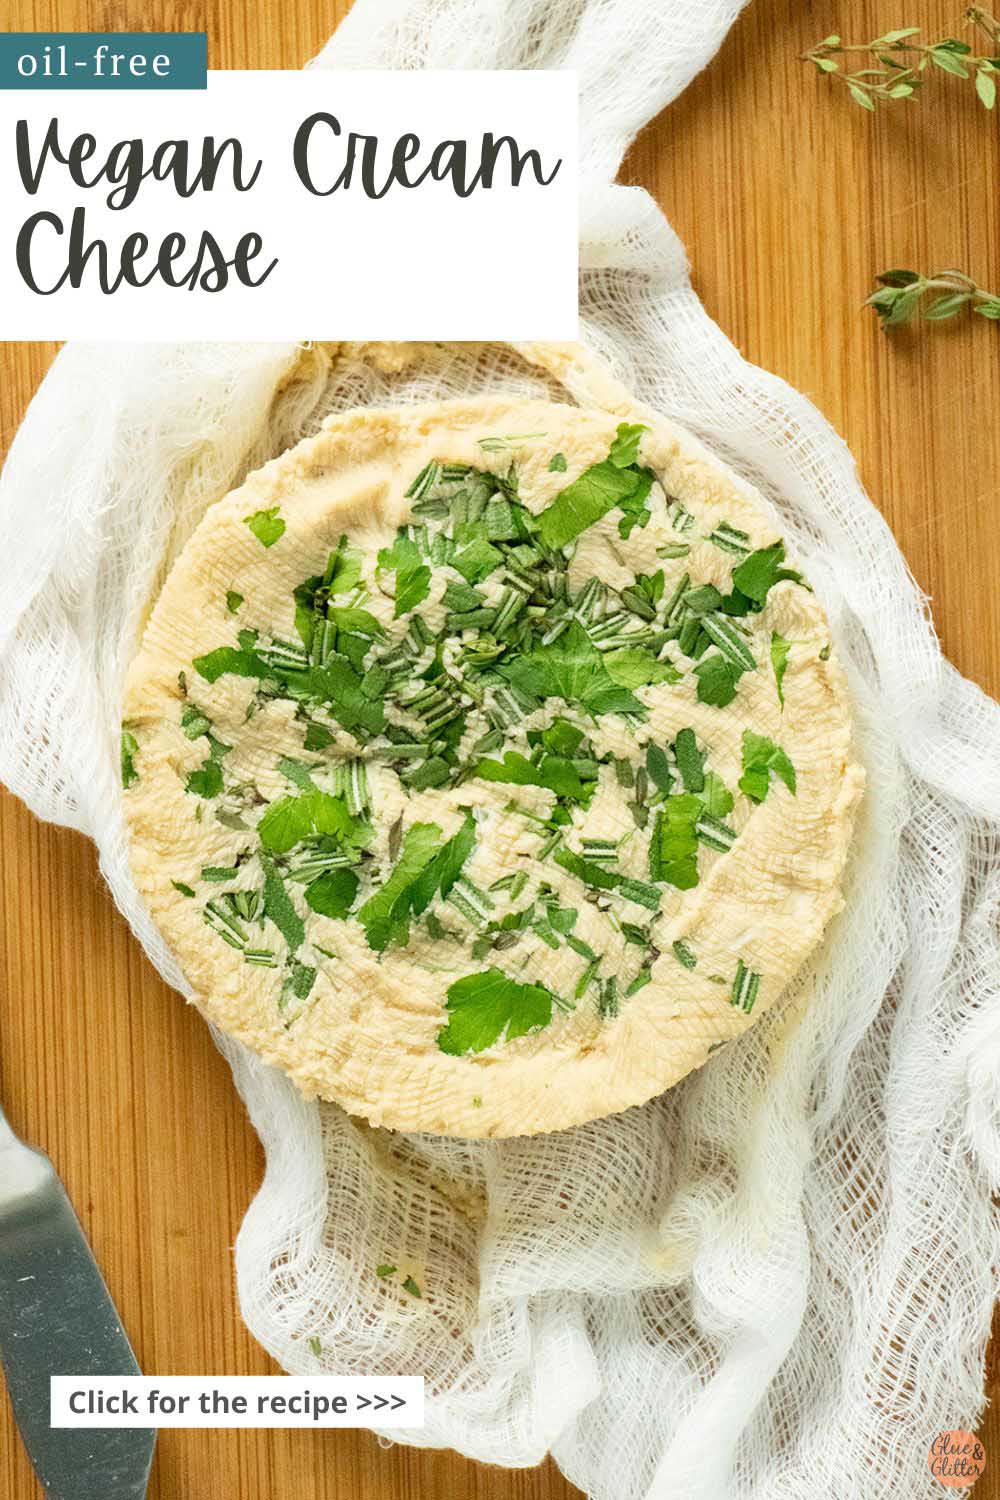
A rich, creamy homemade vegan cream cheese recipe packed with flavorful herbs. Your bagels will never be the same!

I am so delighted to be sharing the vegan cream cheese recipe from Annie Oliverio's new book Crave, Eat, Heal. Annie is one of my favorite food bloggers and food photographers.
This book is extra special to me, because not only do I love Ann, but I contributed a recipe to the book. My Gingered Coconut Sweet Potato Soup is in the warm cravings section.
Recipe notes
Oil-free vegan cream cheese might sound kind of impossible, but it's totally doable! This recipe uses cashews and coconut to achieve a rich, creamy texture without added oil.
To start, get a head of garlic roasting. You can follow Annie's oven directions, but I have to admit that I cheated here. Instead of oven roasting, I used my pal Cadry's recipe for air fryer roasted garlic. It cuts the cooking time in half!
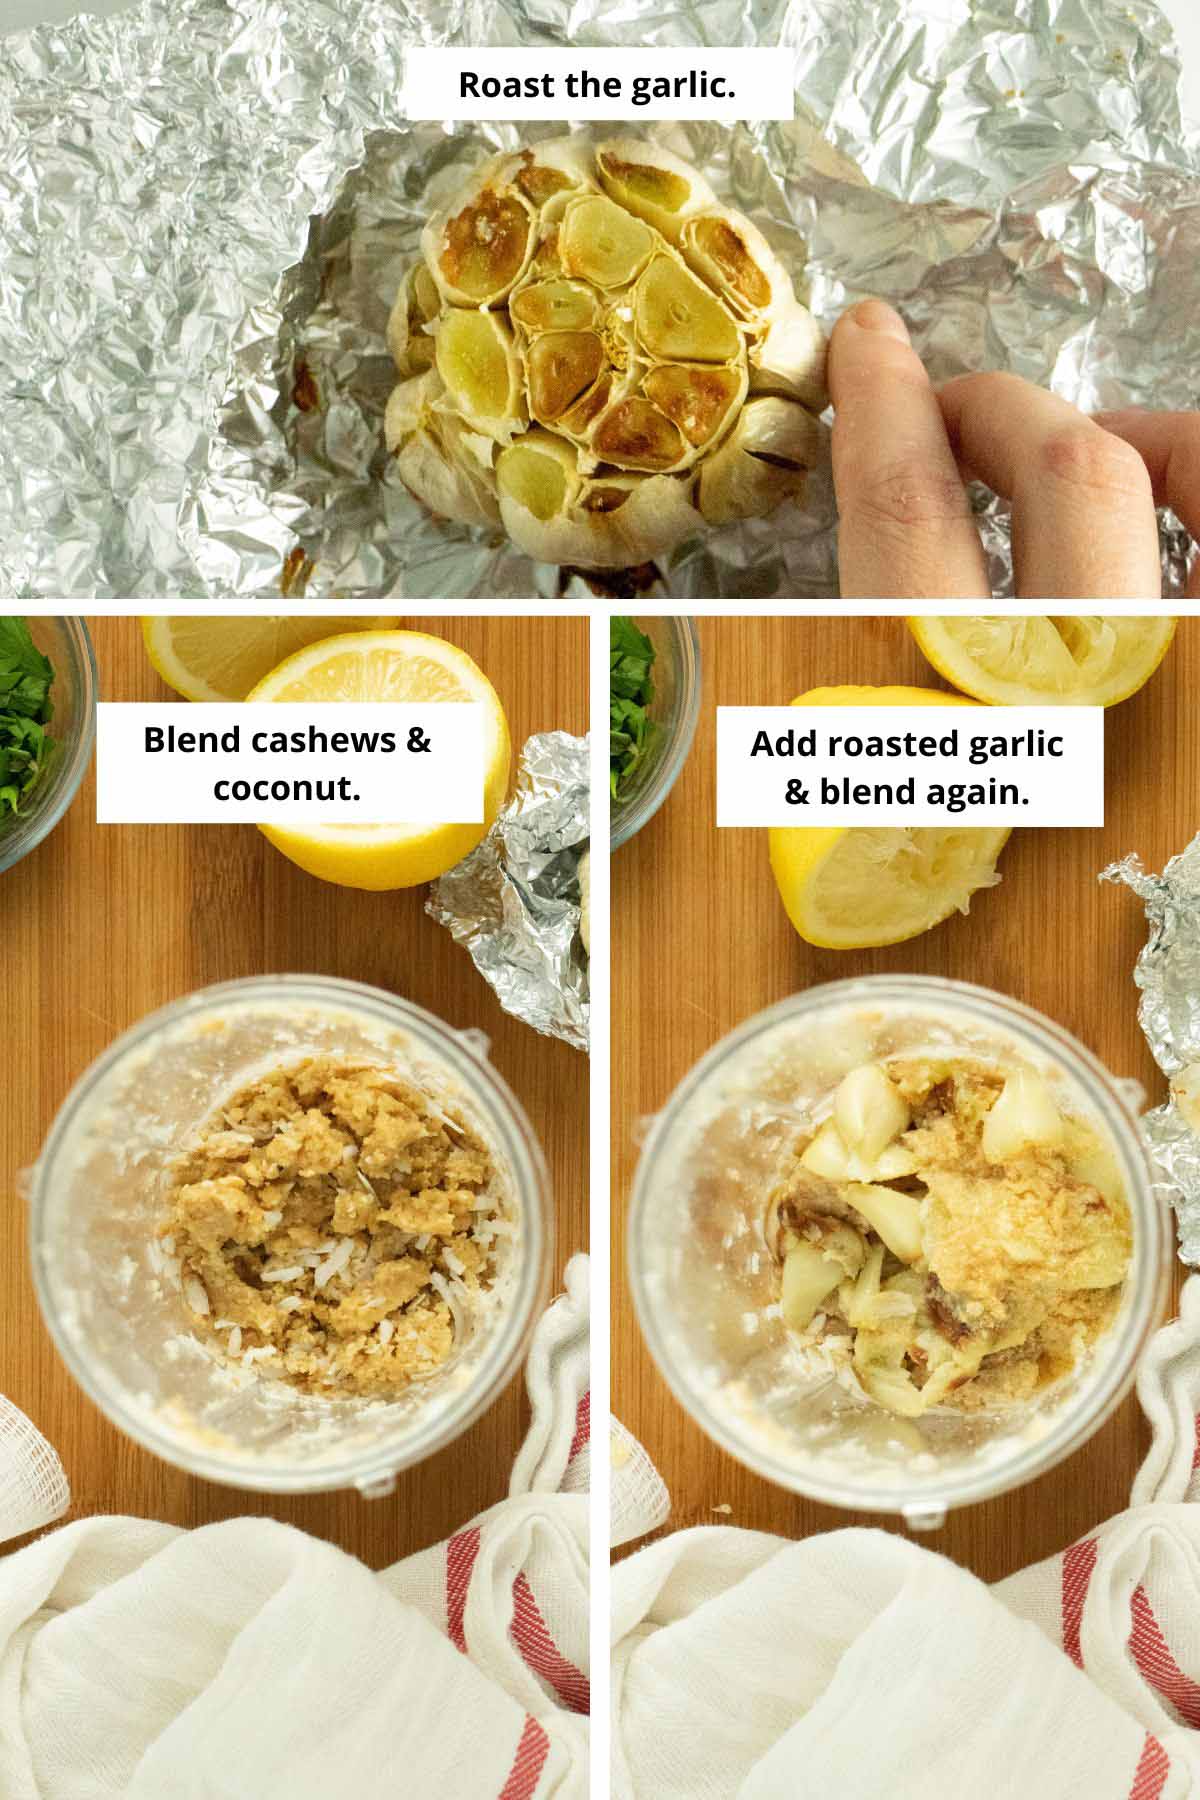
Normally, I wouldn't condone putting foil in the air fryer, but for roasted garlic, it's a must. Just place it carefully, and do not shake. When it's time to remove it, open the basket slowly, and remove it with tongs, taking care at every step not to scratch your basket with the foil.
While the garlic roasts, soak your cashews and coconut flakes to soften them. I used a shortcut here, too. Instead of soaking the cashews overnight, I quick soaked them in hot water for 15 minutes.
Transfer the soaked cashews and coconut flakes to a blender with a bit of salt, and blend until you have a pretty smooth mix. It's ok if it doesn't get completely smooth, so don't worry about perfection at this point.
By now, your roasted garlic should be cool enough to handle. Squeeze the cloves into the blender, and add lemon juice and garlic powder. Blend again, this time going for a really smooth, creamy mix.
You're almost ready to press now!
Line two small ramekins (or, in my case, one lidded Pyrex glass container) with cheesecloth and sprinkle some herbs onto the cloths.
Then, divide the cashew-coconut mixture between the containers (or pour it all in, if you're using one container).
Sprinkle even more herbs on top of your cream cheese, and use cheesecloth to press the mixture firmly into the containers.
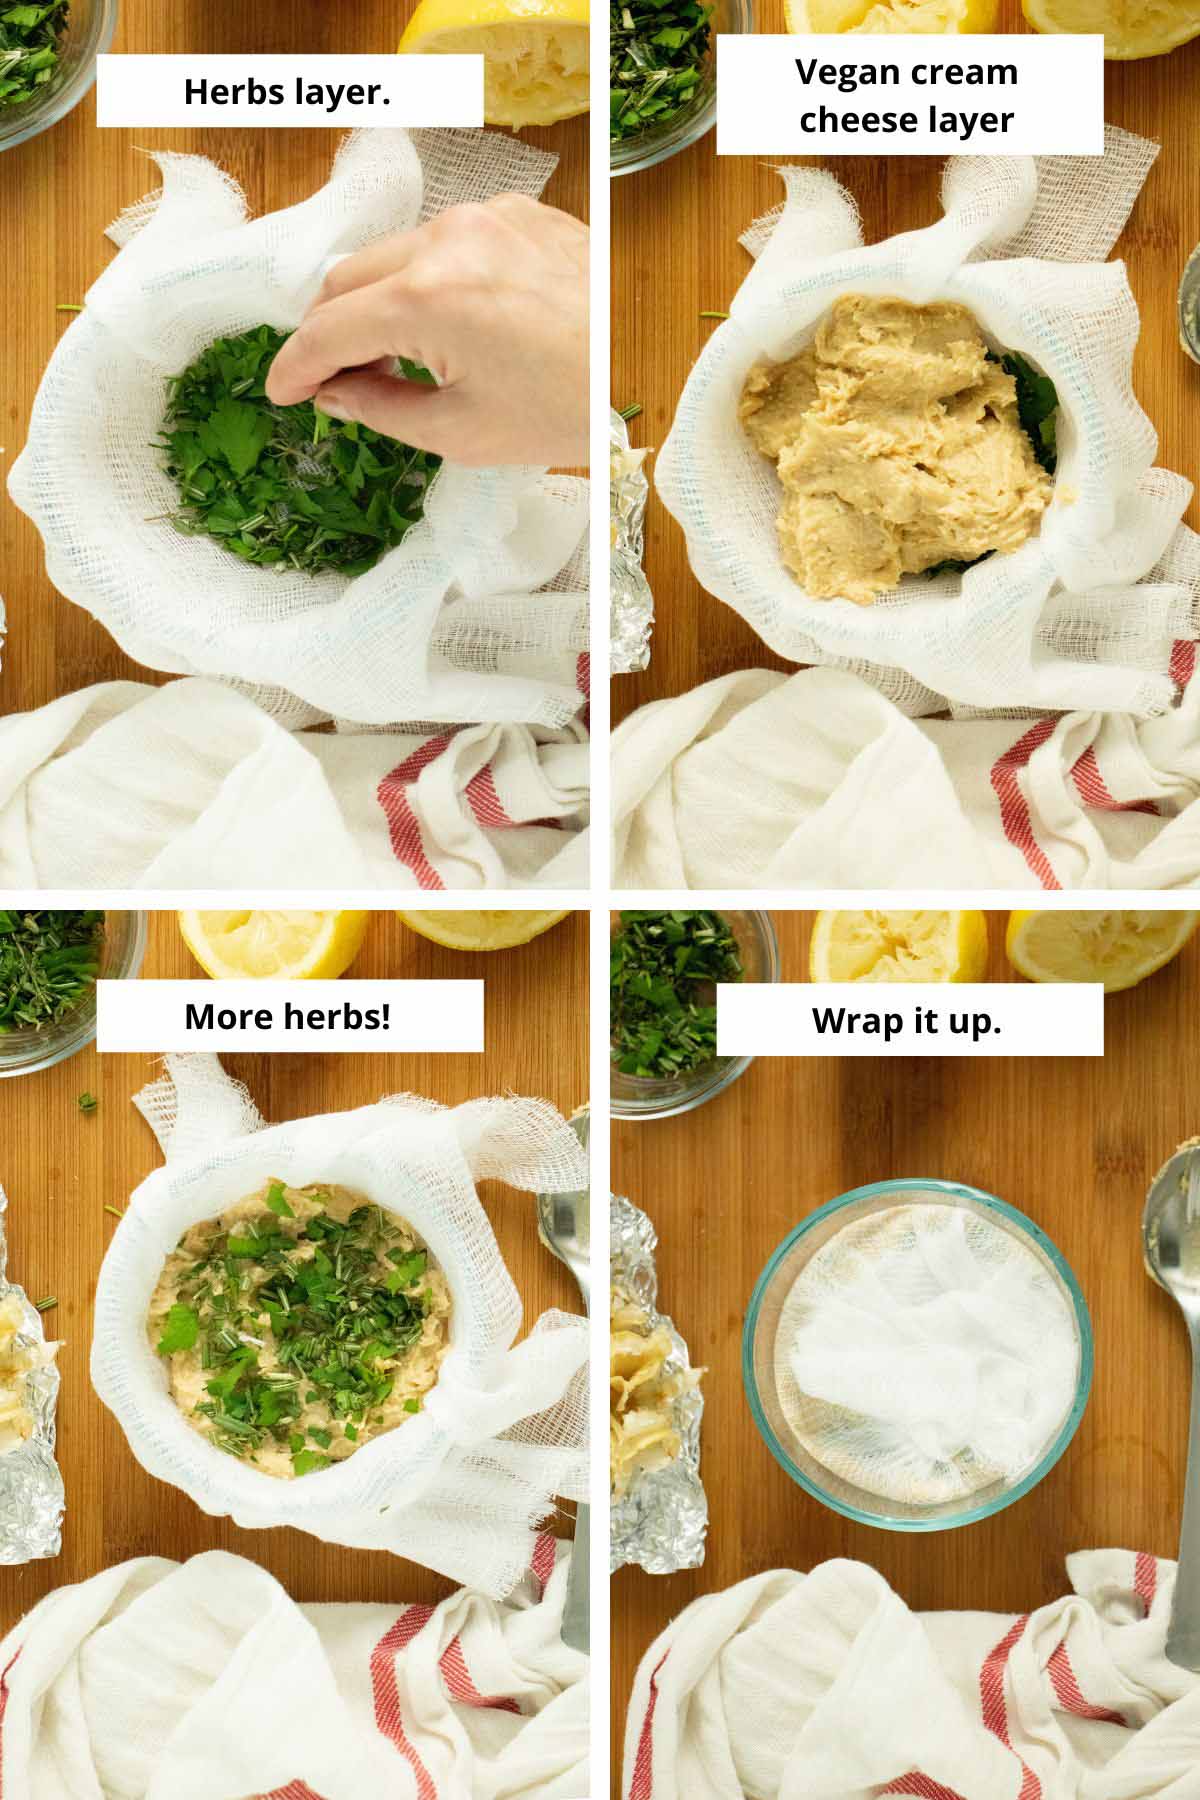
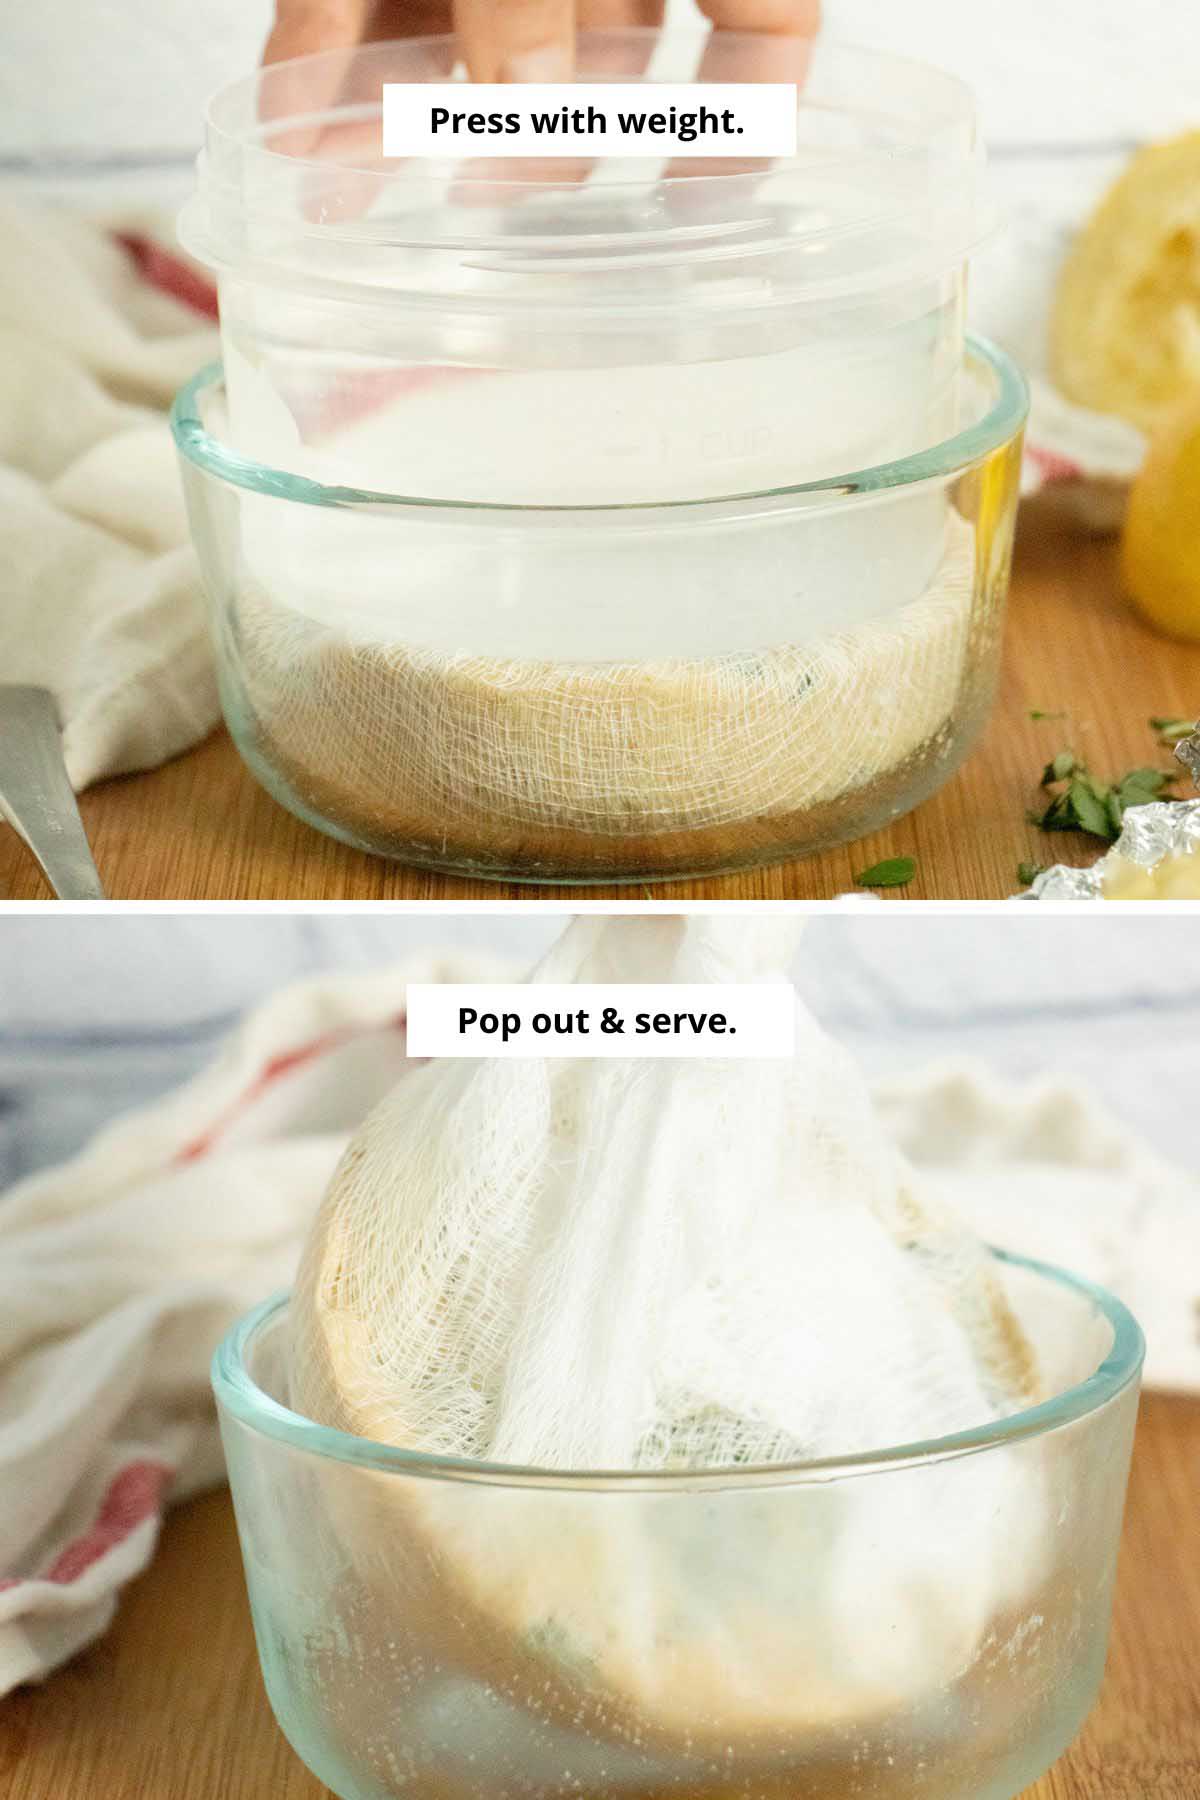
Now, it's pressing time! Stack your containers up, and fill an extra container with water. Put the water container on the top of your cream cheese stack, and stick the whole thing into the fridge overnight.
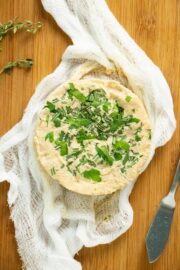
In the morning, pop out the cream cheese, and you are ready for the best bagel of your LIFE!
How Does it Taste?
This vegan cream cheese recipe does have a slight coconut flavor. If you're not mad about coconut, I'd suggest using ¼ cup more cashews in place of the coconut flakes.
I am a coconut fan and really liked the way the lemon, coconut, and garlic flavors melded in this recipe.
Even before pressing, the resulting cream cheese was thick and spreadable. You could totally skip the overnight pressing in a pinch, though the extra time does yield a more cream cheese-y texture.
Storage directions
To store your leftovers, transfer the cream cheese to an airtight container. You could even transfer it back to the same Pyrex lidded container you used to press to save yourself a dish to wash.
It will keep for a week in the fridge.
More vegan cheese recipes

📖 Recipe
Easy Vegan Cream Cheese Recipe
Ingredients
- 1 small head of garlic See notes.
- 4 tablespoons chopped fresh herbs such as thyme, rosemary, chives, and/or oregano
- 1 cup raw cashew pieces soaked in water 8-10 hours, rinsed and drained (See note for my quick soak alternative!)
- ¼ cup coconut butter ¼ cup unsweetened coconut flakes, soaked in water for about 15 minutes, drained (See notes.)
- ¼ teaspoon sea salt
- 1 teaspoon garlic powder
- 3 tablespoons fresh lemon juice
Instructions
- Preheat toaster oven (or oven) to 450° F. Cut off the top ⅓ or so of the garlic and wrap the head in foil. Place the garlic in the oven and roast for 30-45 minutes, or until fragrant and very soft. Remove from the oven and allow to cool completely before unwrapping
- Line two ¾ cup ramekins (see notes) with cheesecloth. Sprinkle the bottoms of the ramekins with one tablespoon each of the herbs, reserving the remaining herbs.
- Meanwhile, in a food processor, process the cashew pieces, coconut butter or coconut flakes, and salt until fairly smooth. (It will not get completely smooth.)
- Squeeze the cloves from the roasted garlic and drop into the bowl of the food processor. Add the garlic powder and the lemon juice and process until thoroughly combined.
- Divide the mixture between the prepared ramekins, pressing the cheese down into the herbs and cheesecloth. Tap the ramekins on the counter a few times and level the top. Divide the remaining herbs between the two ramekins, gently press them into the cheese and cover with the ends of the cheesecloth. Put one ramekin on top of the other and fill a third ramekin with water and place it on top of both ramekins (you’ll have a “tower” of 3 ramekins). Place them in the refrigerator and let set overnight.
- The next day, remove the water-filled ramekin. Gently tug the cheesecloth to remove the cream cheese from the other ramekins and serve with bread or crackers - or place them in an airtight container for up to one week.

Sara
I'm not a cream cheese fan but I think my husband and kids may enjoy. They love to eat cream cheese!
Dividing recipes by cravings is so neat!
Becky Striepe
It's fun to make. Popping it out the next day feels so satisfying!
Anna@Green Talk
Does it taste like coconut? I am not a big fan of the taste but sometimes when you use with other products, you can't taste it as much.
Becky Striepe
It does, a bit. I think you could use maybe an extra 1/4 cup cashews in place of the coconut.
Jen @ Go Green
That looks so good Becky. I am going to step outside of my comfort zone and make it!
Becky Striepe
Hurrah! You will not be sorry. I can't wait to make it again! I'd recommend definitely using the green onions in your herb mix. They're so nice with the garlic.
chrysta@noshed
Love this! I am looking forward to following along with the tour!
Becky Striepe
Thank you! It's an awesome book. So happy to be a part of it.
Emma
I love the concept of this book! So clever. This recipe looks delicious too. Look forward to following the blog tour :)
Becky Striepe
It was super delicious, Emma! My two year old liked it so much.
Poppy
Looks fabulous. I haven't made this one yet! By the way, Diana didn't contribute the recipe, she was a tester :)
Becky Striepe
Ooh thank you for letting me know, Poppy! I will fix that as soon as I'm back at my computer!
Poppy
Of course! :)